Low potato yields almost always come down to one or more of the same handful of problems: bad seed stock, wrong soil conditions, inconsistent water, poor spacing, heat stress during tuber set, or disease pressure that hit before anyone noticed. If you walked away from your potato patch this season wondering why Mark (or you) couldn't grow more potatoes, this guide will help you pinpoint the actual cause from your symptoms and tell you exactly what to fix, both right now and before next season's planting. If you walked away from your potato patch this season wondering why Mark (or you) couldn't grow more potatoes, this guide will help you pinpoint the actual cause from your symptoms and tell you exactly what to fix, both right now and before next season's planting.
Why Couldn’t Mark Grow More Potatoes Fixes for Next Season

Start Here: Quick Yield Check and Symptom ID

First, let's set a realistic benchmark. A well-managed 10-foot row of potatoes should yield somewhere between 20 and 30 pounds. A less-optimized row still realistically produces 6 to 15 pounds. If you're landing below that lower number, something went measurably wrong. If you're in that 6–15 lb range but expected the high end, the issue may simply be management, not failure.
Before you start digging into causes, match your situation to the most common symptom patterns below. This narrows the diagnostic work considerably.
| What You See | Most Likely Cause(s) | Where to Look in This Guide |
|---|---|---|
| No tubers at all, healthy-looking vines | Heat stress during tuber initiation, too much nitrogen, wrong timing | Sunlight, Temperature, and Timing |
| Tiny or very shallow tubers | Not enough hilling, shallow planting, late irrigation stress | Planting Depth, Spacing, and Hilling |
| Uneven stand, missing plants, delayed emergence | Bad seed pieces, improper cut/storage, disease in seed tuber | Seed Potato Quality |
| Tubers with rough, corky, pitted skin | Common scab (high soil pH, dry conditions at tuber set) | Soil and Bed Setup |
| Yellowing lower leaves early in season | Nitrogen deficiency, waterlogged roots, disease | Watering and Nutrients |
| Dark spots on leaves, white fuzzy growth underneath | Late blight — act immediately | Pests and Diseases |
| Holes in foliage, defoliated stems | Colorado potato beetle, flea beetles | Pests and Diseases |
| Rotten tubers at harvest | Poor drainage, late blight spread to tubers, leaving in wet ground too long | Soil and Bed Setup / Pests and Diseases |
Seed Potatoes: Quality, Cut Size, Storage, and Timing
This is the step most people underestimate, and it's frequently the root cause of a disappointing harvest. The potato you plant determines the plant you get. Using grocery-store potatoes or saving tubers from a diseased crop almost guarantees problems, because both can carry viruses, fungal spores, and bacterial pathogens right into your bed from day one.
Start with certified disease-free seed potatoes from a reputable supplier every season. When you cut larger seed pieces, each piece needs at least one strong eye (sprout point) and should weigh roughly 1.5 to 2 ounces, about the size of a golf ball. Sprouts should be about 1/4 inch long at planting time, that's the sweet spot between dormant (slow to emerge) and overly long (brittle, breaks off during planting). After cutting, let the cut surfaces cure for 1 to 3 days at room temperature before planting. This drying step forms a protective callus over the cut face and dramatically reduces the chance of rot in the ground. Skipping this step is one of the most common reasons new growers end up with gaps in their stand, delayed emergence, and ultimately low plant counts, which directly caps your total yield before the season even starts.
Timing matters here too. Plant seed potatoes 2 to 4 weeks before your last expected frost date in spring (they tolerate light frost). In warmer climates, fall or late-winter planting may be more appropriate than spring. Planting too early into cold, wet soil causes the cut pieces to sit and rot rather than sprout. Soil temperature at planting depth should be at least 45°F, and ideally closer to 50°F.
Soil and Bed Setup: Depth, Drainage, Fertility, and Compaction
Potatoes are unforgiving of bad soil structure. They need loose, well-drained soil to a depth of at least 8 to 12 inches so tubers can expand without resistance. Compacted or clay-heavy soil physically stunts tuber growth and retains water in ways that promote rot. If you're growing in heavy clay, raised beds or hilled rows with added compost are not optional luxuries, they're basic requirements.
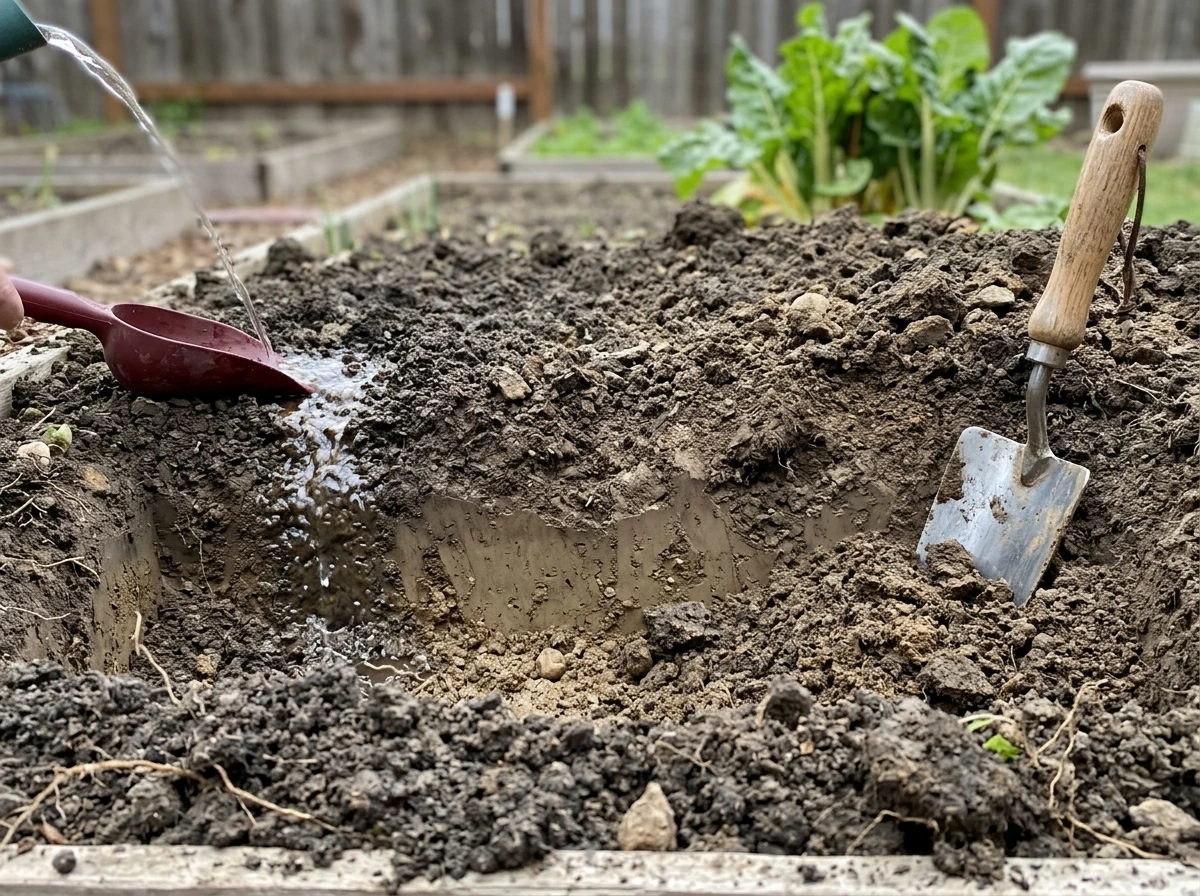
Drainage is equally critical. Waterlogged soil at tuber-initiation time is one of the fastest paths to rot and disease. Before you plant, check that water doesn't pool in your potato bed after a heavy rain. If it does, raise the bed height, add organic matter to improve structure, or switch to a container-based approach.
Soil pH for potatoes is a balancing act. Potatoes grow best in the 5.0 to 6.0 range, and specifically, keeping pH at 5.0 to 5.2 significantly suppresses common scab, the disease that causes rough, corky lesions on tuber skin. If your soil pH is above 6.0 and you're seeing scab damage, that's likely your cause. Use elemental sulfur to lower pH over time, or acidify with pine needle mulch as a lighter intervention. Don't add lime to potato beds unless a soil test shows you're below 5.0.
For fertility, incorporate a balanced or slightly phosphorus-heavy fertilizer (something like a 5-10-10) and plenty of compost before planting. Potatoes are heavy feeders over a long season, but they're sensitive to excess nitrogen early on, which pushes lush vine growth at the expense of tuber production. Think of it this way: if your plants look gorgeous and green but you dug up almost nothing, nitrogen is a likely suspect.
Planting Depth, Spacing, and Hilling
Tubers form on the [underground stems above the seed piece](/container-gardens-food-plots/potato-grow-roots-can-eat), not on the roots. This means where and how you plant directly controls how much room the plant has to set tubers. Plant seed pieces 4 to 6 inches deep and space them 10 to 12 inches apart in the row, with rows 2.5 to 3 feet apart. Too close and you'll get overcrowded plants competing for water and light, resulting in more small tubers and less total weight. Too far apart wastes bed space unnecessarily. potato grow sprouts can eat
Hilling is non-negotiable if you want a real yield. When stems reach about 8 to 12 inches tall, mound soil up around the base, covering the lower half of the stems. Repeat this one or two more times as the plants grow. This does two things: it creates more underground stem length for tubers to form along, and it prevents tubers near the surface from being exposed to light (which turns them green and toxic). If you skip hilling or only do it once, you're leaving a significant portion of your potential harvest underground and unexpanded. Some growers use the trash-can or container method to make this process easier by adding soil gradually as the plant grows, which is worth exploring if you're working with limited space. garbage can potatoes grow
Watering and Nutrients During Key Growth Stages
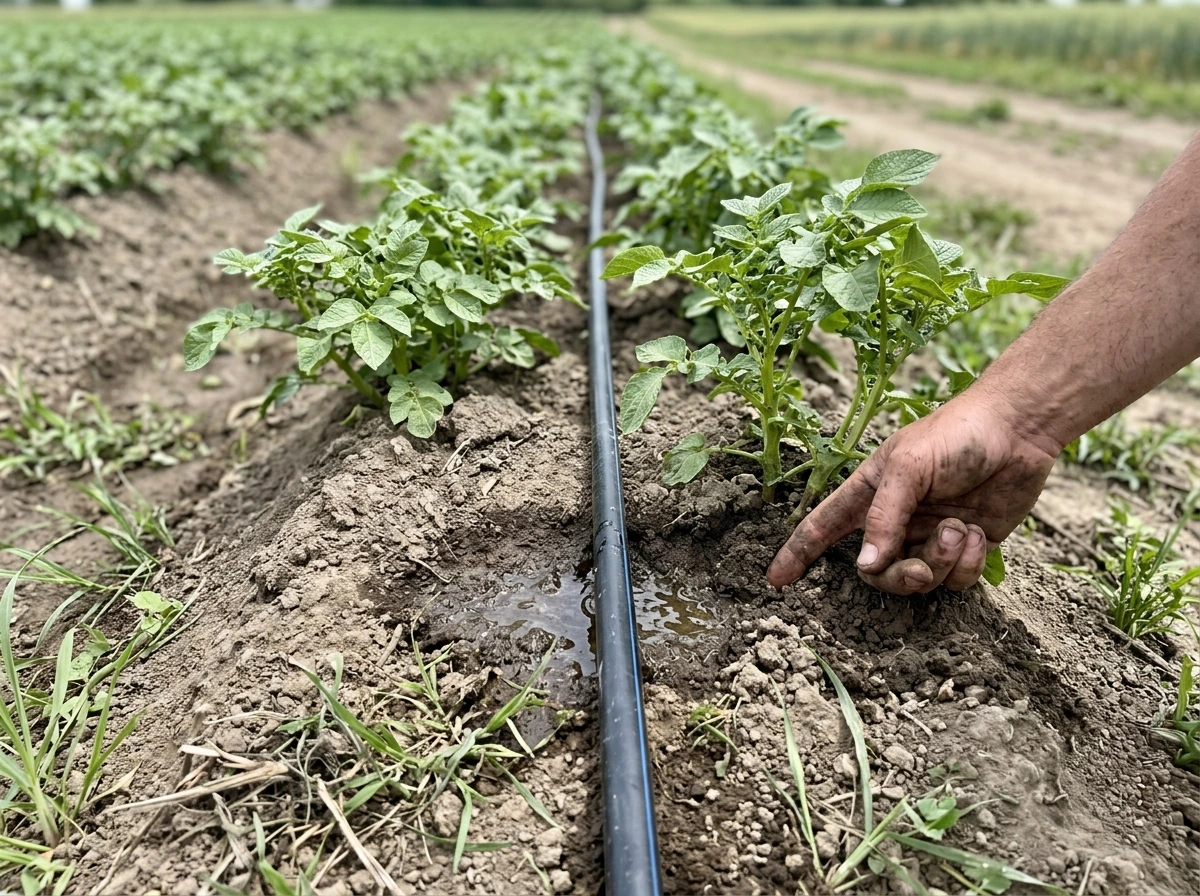
Potato irrigation isn't one-size-fits-all across the whole season. There are two stages where consistency matters most: tuber initiation (roughly 6 to 8 weeks after planting, when flowers appear) and tuber bulking (the 4 to 6 weeks after initiation when tubers are actively sizing up). During both of these windows, aim to keep soil moisture at 80 to 90% of available water capacity, meaning you're only allowing about 10 to 20% depletion before watering again. Practically, this means about 1 inch of water per week from rain or irrigation, and more frequent checks in sandy soil since sandy ground only retains moisture to about 10 inches while clay soil holds it to about 6 inches from the same amount of water.
Inconsistent watering, especially alternating between drought stress and heavy soaking during tuber bulking, causes hollow heart (internal voids), cracking, and knobby tubers. It's not just an aesthetics issue, it also signals to the plant that conditions are unreliable, which suppresses further tuber development. Drip irrigation or soaker hoses are worth the investment if you've had inconsistent watering problems in the past.
On the nutrition side, a mid-season side dressing of a balanced fertilizer about 6 weeks after planting helps sustain tuber bulking without pushing excessive late vine growth. Yellowing that starts at the bottom leaves and moves upward is often a nitrogen deficiency signal and warrants a quick foliar feed or side-dress application. Yellowing that starts at the top or shows interveinal patterns points more toward micronutrient issues or disease, not a simple nitrogen fix.
Sunlight, Temperature, and Timing Constraints
Potatoes need full sun, meaning at least 6 to 8 hours of direct light per day. Less than that and you get poor vine growth, which limits the photosynthate available to fill tubers. This one is simple: if your potato bed is shaded for part of the day by a fence, tree, or building, yields will be noticeably lower and no amount of fertilizer or water will fully compensate.
Temperature is the trickier constraint, especially if you're growing in warmer climates. Tubers form most efficiently when soil temperatures are between 60°F and 70°F. Once soil temps push above 80°F, tuber initiation slows dramatically, and above that, it essentially stops. If you're in a region with hot summers, this is the primary reason your yield is disappointing, the plants are trying to set tubers during the worst possible window. Research from Texas A&M shows that for every degree Fahrenheit above the optimum temperature range for tuberization, yield drops by roughly 4%. That adds up fast in a heat wave.
The fix for heat-stressed timing is to shift your planting date. In warm climates, this often means planting in late winter for a late spring harvest, or planting in late summer for a fall harvest, completely avoiding the summer heat window. In northern climates, simply planting as early as your soil allows gives tubers the maximum cool-soil window before summer hits. This is one of the highest-leverage changes you can make and it costs nothing.
Pests and Diseases: How to Prevent and What to Do Fast
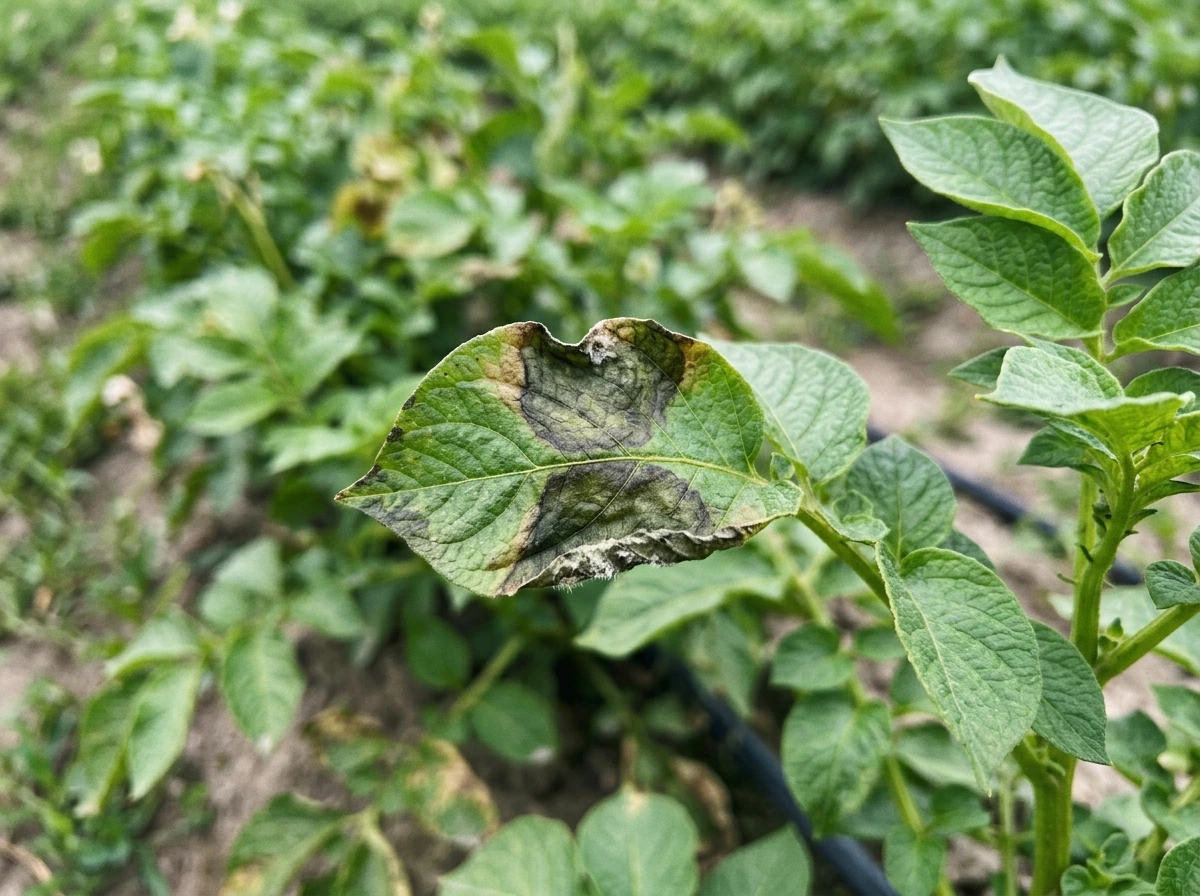
Late Blight
Late blight is the most destructive potato disease you'll encounter, and it's the reason entire harvests fail seemingly overnight. Look for water-soaked, irregularly shaped lesions on leaves and stems, often with a white fuzzy growth on the underside of leaves in cool, wet weather. Once late blight reaches high pressure in your garden, fungicides lose most of their effectiveness. This is a disease you must catch early or prevent entirely. Apply a preventive copper-based fungicide before symptoms appear when cool, wet weather is forecast, and maintain a 7 to 10 day spray interval during favorable conditions. If you're seeing active lesions, immediately remove and bag infected tissue (don't compost it) and continue spraying what's left. If plants are largely infected and harvest is close, let the vines die completely on their own and wait 2 to 3 weeks before digging, which allows the skin to set and reduces the chance of blight spores contaminating tubers during harvest.
Colorado Potato Beetle
These beetles, both adults and larvae, can completely defoliate a plant if left unchecked. They're the yellow-and-black striped beetles you'll recognize immediately. Scout your plants every few days starting at emergence. Hand-pick egg masses (orange clusters on leaf undersides) and larvae before populations explode. Spinosad and neem oil are effective organic options. Rotate your potato bed every year, since beetles overwinter in soil near where their host plants grew the previous season, which dramatically reduces your starting population.
Common Scab and Other Soil Diseases
Common scab won't kill your plants or eliminate your harvest, but it does make tubers look rough and corky, and it reduces marketability and storability. As covered in the soil section, keeping pH at 5.0 to 5.2 is the most effective control. Additionally, keeping soil consistently moist (not waterlogged) during the first few weeks after tuber initiation significantly reduces scab severity, because dry conditions at that stage strongly favor the scab pathogen.
General Disease Prevention
- Rotate potatoes to a different bed every year and avoid planting where tomatoes, peppers, or eggplant grew the previous season (all share soilborne diseases)
- Always use certified disease-free seed potatoes, never grocery store tubers
- Remove and destroy any plant debris at the end of the season rather than tilling it in
- Water at the base of plants rather than overhead to keep foliage dry
- Ensure good air circulation by not overcrowding plants
Your Action Plan: What to Change Now vs. Next Season
Not every fix requires waiting until next year. Some things can be addressed in the current growing window, and some are genuinely next-season work. Here's how to sort them.
Things You Can Do Right Now
- Scout for pests and disease today. Walk the bed, flip leaves, and look for late blight lesions or beetle eggs. Early action saves the remaining crop.
- Check soil moisture. If you haven't been watering consistently and tubers are still sizing up, get on a regular schedule immediately. One inch per week, more in hot weather.
- Side-dress with balanced fertilizer if plants are yellowing from the bottom up and you're still 3 to 4 weeks from harvest.
- Hill any unhilled beds if plants are still actively growing. Even one good hilling session now can improve the tuber cover on what's forming.
- If late blight is confirmed, start your spray program today and plan for a vine-kill and wait strategy if infection is heavy.
Changes to Make Before Next Season
- Get a soil test this fall so you know your pH and nutrient levels before spring. Amend accordingly with sulfur to drop pH if needed.
- Source certified seed potatoes early, ideally by February, before good varieties sell out.
- Plan your planting date around your local soil temperature, not just the calendar. Target 50°F soil at planting depth.
- Set up drip irrigation or soaker hoses if hand-watering has been inconsistent.
- Rotate your potato bed to a new location. This alone removes a large share of soilborne disease and beetle pressure.
- Choose a variety suited to your climate and pest pressure. Scab-resistant varieties exist if that's been your recurring problem.
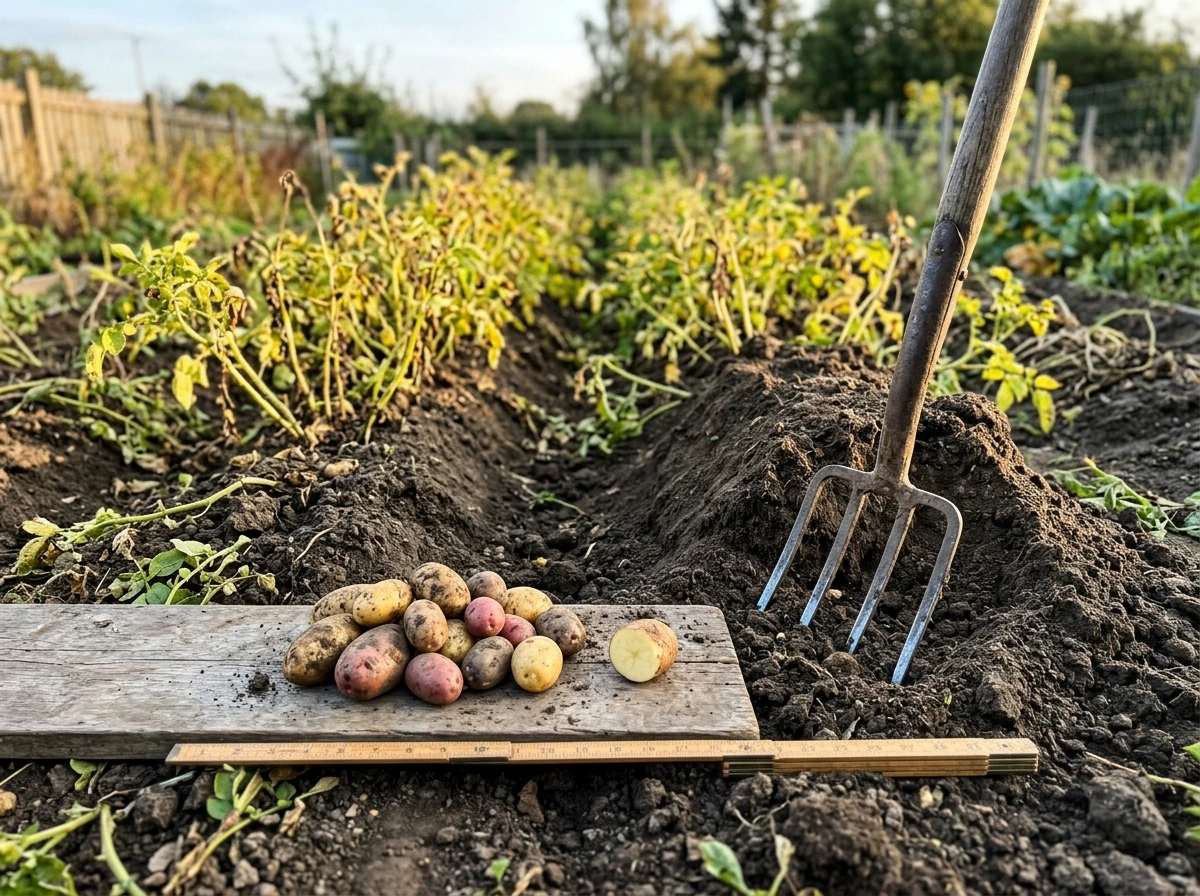
Yield Math: Is Your Goal Actually Realistic?
Let's do a quick sanity check on expectations. If you planted a 20-foot row with seed pieces spaced 12 inches apart, you have roughly 20 plants. At a conservative yield of 1 pound per plant, that's 20 pounds total. At an optimistic 1.5 pounds per plant with good management, you're at 30 pounds. A 10-foot row at peak management (Iowa State's upper-end estimate) gets you 20 to 30 pounds. If you were expecting 50 or 60 pounds from a small bed, the issue may be as simple as not having enough plants in the ground. Scaling up yield means scaling up either row length, plant density (within the 10 to 12 inch spacing limit), or both. Containers and trash-can setups can help if ground space is limited, and can produce a surprising amount per square foot when managed well.
Once you know your realistic target, work backward: how many 10-foot rows do you need to feed your household through winter? If each 10-foot row yields 20 to 25 pounds of storage potatoes and your family uses roughly 10 pounds per month, you need about 5 rows to cover a 10-month storage window. That's a 50-foot total planting, which is very achievable in a backyard garden. The math makes the problem concrete, and concrete problems have concrete solutions.
Growing potatoes well isn't complicated, but it is specific. Every low-yield situation I've seen traces back to one or two fixable factors, not some mysterious failure. Match your symptoms to the causes in this guide, make the right changes in sequence, and next season's harvest will look very different.
FAQ
Can I “save it” mid-season if Mark couldn’t grow more potatoes, or is it already too late?
Yes, but only in specific cases. If your plants are healthy green vines yet you dug very few tubers, you likely under-planted (too few seed pieces), set the tubers too shallow, or skipped one or more hilling passes. If you see lots of small tubers and rough, corky surfaces, focus first on spacing, consistent moisture around tuber initiation, and soil pH (5.0 to 5.2).
What can I change right now if my potatoes are already heat-stressed or growing poorly?
You generally should not. If you cut back heat-stressed crops by delaying watering or skipping fertilization, you often worsen tuber initiation. What you can do now is protect the tuber zone (deep mulch that doesn’t smother stems), keep moisture steady during bulking, and avoid additional nitrogen that would push more vine growth instead of tubers.
How do I figure out whether low yield is from too few plants or from poor tuber growth?
Check stand count, not just final tuber size. Limited yield often comes from low plant numbers caused by rotten seed pieces or poor emergence after planting into cold, wet soil. A practical move is to count emerged plants along a measured row section (for example 10 feet) and compare it to the spacing you planted.
What mistakes when cutting seed potatoes most often cause low yields?
Treat cutting errors as a top-tier suspect. If seed pieces were too small, had missing eyes, were planted before cut surfaces cured, or had sprouts longer than about 1/4 inch at planting, you commonly get gaps and delayed emergence. Also avoid planting freshly cut pieces directly into cold, saturated soil, because the callus is not formed yet.
If my potatoes look rough or corky, is scab the main issue, and what’s the fastest way to reduce it?
If the problem is scab, you can improve appearance and storage quality, even when total yield is unchanged. Prioritize pH between 5.0 and 5.2 (preferably based on a soil test), and keep the soil evenly moist during the first weeks after tuber initiation, then continue to prevent drought spikes during bulking.
What should I do if I suspect late blight, and when should I stop trying to save the vines?
Late blight control depends on timing. If you see active lesions, remove and bag affected tissue and keep spraying what remains on a schedule, because new growth can become infected quickly during cool, wet weather. If harvest is near and vines are heavily diseased, letting vines die on their own and waiting a couple of weeks helps skin set and reduces contamination risk.
How do I prevent Colorado potato beetles from ruining most of my harvest?
Potato beetles can cause major yield loss even before you notice tuber issues. The useful action is early scouting from emergence, remove egg masses, and manage adults and larvae before defoliation accelerates. Also rotate beds, since beetles overwinter close to last year’s host plants.
My bed stays wet after rain, can I just water less, or do I need a bigger change?
If drainage is poor, the fix is structural, not just more watering. In waterlogged beds, roots and tubers sit in oxygen-poor conditions, which drives rot and disease. Practical options include raising bed height, improving soil structure with organic matter before planting, or switching to container or trash-can culture to control runoff.
Should I add lime or sulfur without a soil test if my scab is bad?
Soil tests make this much easier. If you can’t test, you can still observe likely drivers, but don’t “guess” with lime. The guidance here is to avoid adding lime unless a test shows you’re below 5.0, because raising pH above 6.0 increases scab risk.
If I only planted a small patch, how can I tell whether the problem is genetics or simply not enough plants?
Yes, yield expectations change with planting plan. If the bed is too small, you may have enough management but not enough plant count. A quick decision aid is to estimate plants from spacing, then compute whether you have the row length to hit your household storage goal.
How do irrigation targets change if my soil is sandy versus clay?
On sandy soils, moisture drops fast, so “one inch per week” can still under-water during bulking. Use frequent soil checks and adjust irrigation to keep the depletion window tight during tuber initiation and bulking, since sandy ground can only hold moisture to a shorter effective depth.
If my potatoes are small, should I blame spacing, or are other causes more likely?
Many growers over-tighten the spacing once they see small tubers. But overcrowding mainly affects light and competition, creating more small tubers. If you’re already at or near 10 to 12 inches in-row, focus next on consistent moisture and hilling frequency, since spacing adjustments alone won’t fix heat stoppage or disease damage.
What Nutrients Do Beans Need to Grow? Soil and Care Guide
Learn beans nutrients by growth stage, nitrogen fixation, soil tests, and how to amend for healthy pods.